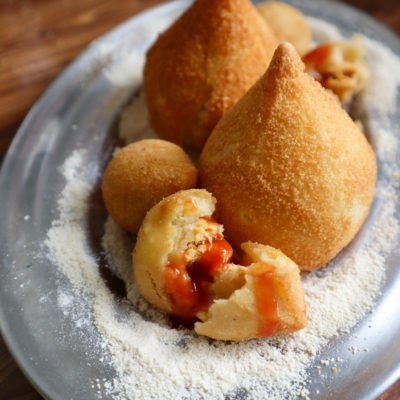
Authentic Brazilian Coxinha
Brazilian coxinha is the perfect snack food. It is also a great dinner that you can make ahead of time and keep in the freezer. Made with chicken, a special pastry dough, and cream cheese--you can't go wrong with this finger food.
Ingredients
- 1 large chicken breast
- oil for frying and deep frying
- 1 cube chicken bouillon
- 2 1/2 cups water
- 1 tsp salt
- ground black pepper to taste
- 4 oz cream cheese - or - 1/2 cup sour cream
- 2 garlic cloves, minced - or - 2 tsp garlic powder
- 1/2 onion, minced - or - 1 tsp onion powder
- 2 Tbsp minced green onion
- 1 tsp ground black pepper
- 1 Tbsp tomato paste (or ketchup)
- 1 tsp fresh parsley, minced (optional)
- 1 tsp sweet paprika (optional)
- 1/2 cup shredded mozzarella cheese
Pastry Shell:
- 2 Tbsp salted butter
- 1/2 tsp chicken bouillon
- 1 cup milk + more for dredging
- 2 cups chicken broth (reserved from the filling)
- 2 1/2 cups all-purpose flour + more flour to dust hands
Assembly:
- 1 cup fine, plain breadcrumbs
- 1/2 cup milk
Instructions
FILLING
- In a saucepan, add water, the chicken breast, chicken bouillon, and a dash of salt. Boil the chicken until cooked through. Remove from the heat. Reserve 2 cups of the broth. Remove the chicken from the pan and shred it finely. (An easy way to do this is to use a stand mixer and simply mix the chicken until it is well shredded.) Sauté the onion and garlic in a pan and add the chicken after about a minute. Cook just until the onion and garlic are soft and fragrant. Remove from the heat. Add the green onion, salt, pepper, paprika, parsley, tomato paste, shredded mozzarella cheese, and cream cheese and mix until well combined. Set aside.
PASTRY SHELL
- In the saucepan, mix together the 2 cups of reserved chicken broth, chicken bouillon, butter, and 1 cup of milk. Bring to a boil. Slowly pour in the flour, a little at a time, stirring constantly with a whisk at the beginning and a wooden spoon after it begins to form a dough. Make sure it is mixed thoroughly. Cook on the stove, stirring constantly, until it begins to separate from the bottom of the pan. (This is a common Brazilian way of cooking and measuring when food is "done": Drag a spoon across the bottom of the pan; if you can see the bottom and the dough holds most of its shape without running quickly to cover the exposed pan, it is done. This usually takes about 2 minutes for me.) Remove from the heat. Allow to cool slightly, just until you can handle the dough without scorching your hands.
ASSEMBLY
- Pour the 1/2 cup of milk in a bowl. Pour the breadcrumbs in another bowl. Set aside.
- When the dough is cool enough to handle, dust your hands and fashion it into balls. For large coxinha, make about 8-10 balls. For smaller coxinha, make about 15-18 balls. (My dough balls look more like lumps. The idea is just to portion out the dough evenly. 😉 If this is your first time making coxinha, I recommend making larger balls of dough, as they will be easier to handle.) The dough might still be sticky, so use a generous amount of flour on your hands.
- Once the dough is measured out, take each piece one-by-one and make the coxinha. To assemble the coxinha, flatten the dough ball in one palm. The dough should still be thick enough that it will not easily snag or open up (about ½ inch or so in thickness). Put about 1-2 Tbsp of chicken filling inside (depending on the size of the dough ball and how much it can hold). Fold the sides of the dough around the chicken filling and pull the sides together at the top, making the signature spire (which looks a lot like a kewpie baby's hair). If the spire does not hold its shape well, no worries. It will still taste just as good. IMPORTANT: Make sure that there are no holes or gaps in the pastry shell, as this will cause the filling to leak out into the oil while frying and also affect the taste of the filling because oil will get inside.
- Roll the coxinha ball in the bowl of milk, turning to moisten all sides, and then roll it in the bowl of breadcrumbs, likewise coating all sides. Repeat for all the other coxinha.
- To fry the coxinha, heat up about 2 cups of oil over medium heat in a deep pan to 120 F, or just until beginning to show ripples on the surface. (I have found that using a pan of small circumference and great depth helps me save some oil.) Add the coxinha. Fry on each side just until beginning to brown. This should take about 2-3 minutes. If you find that your coxinha are browning rather quickly, reduce the heat. When golden brown on all sides, remove the coxinha to a paper-towel-lined dish to drain the oil. (Please note that the dough inside of the fried shell will still be a bit doughy. That is normal and is exactly how Brazilians cook it, and it tastes delicious.)
- Serve hot with ketchup and mayonnaise for dipping. (Take my word for it: Mayonnaise is ideal for dipping coxinha. Just give it a try!)
Notes
More variations: Try adding a small cube of mozzarella in the center of the coxinha. For more flavor, you can mix in a bit of oregano or chopped fresh cilantro. Use Italian breadcrumbs for a scrumptious exterior shell.